Before the cleaning drive begins, Let’s ensure everything is smooth and safe with this washing machine Installation and maintenance guide. While washing machine installation may not sound rocket science, there is a need to understand the basic requirements to ensure safe and smooth operations in the long run. Improper installation may lead to unpleasant circumstances resulting in your investment overrun.
This article will guide you through pre-installation considerations, step-by-step washing machine installation tutorials, maintenance tips, ensuring safety post-installation, and some frequently asked questions, common in the washing machine domain.
Let’s start!
Washing Machine Installation step-by-step Tutorial
The process of washing machine installation can be divided into two phases: Planning and Execution.
This section outlines the planning phase as Pre-Installation considerations and the execution phase as the washing machine Installation process. Let’s look at each of them one by one.
Pre-Installation Considerations
Ensure you have everything in place before you start installing your washing machine. This may include analysing installation tools, location for installation, water and electricity sources, and other requirements. The points outlined below guide you on how to do this.
Choosing the Right Location
Whether you plan your washing machine installation in the balcony or the utility area, ensure the location meets the below listed requirements, before you initiate the washing machine installation process.
- Water and electrical outlets should be well within the reach of the electrical cord and supply water hose.
- Ensure the water tap supports mounting the hose adapter and the electric source point has the right size socket.
- Most washers operate at 15-Amps; ensure the socket supports connecting the 15-amp electrical chords.
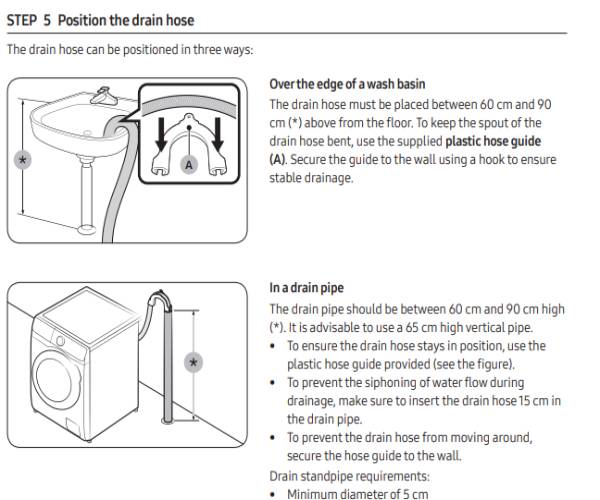
- Ensure the drain pipe approaches the floor drain conveniently. Please keep sufficient margins as the spin cycles may displace the drain hose out from the preferred location if the drain pipe lies tight on space.
- The floor should be even to support smooth washing machine operation. An uneven floor can cause excessive vibrations and noise during operations.
If you find the floor surface uneven, we recommend using washing machine stands to help fill out the unevenness by adjusting the screwed base of the washing machine stands. Using washing machine stands will help clean the floor beneath the washing machine, further.
Anti-vibration pads can also be used to arrest or mitigate the natural vibrations arising out of a design defect of the washing machine.
Understanding Water Supply Requirements
While some washing machines can fill water at Zero pressure (Zero pressure fill technology, ZPF), Others may require a standard water pressure between 20 and 80 psi (pound per square inch). Lower pressure may result in inadequate water flow and longer washing times, while higher pressures can cause leaks or hose damage. Please ensure you understand the water supply requirements and fix the gaps before initiating the washing machine installation.
Reviewing Drainage Options
Review the drainage options to ensure accommodating the wastewater flow from the machine. Homes using standpipe drainage systems should ensure 2 2-inch diameter for the drain pipe to avoid building water backups or potential flooding situations. Make sure the hose is firmly inserted into the drain to prevent dislodging during use.
Checking Electrical Connections
Ensure you have the right size electrical socket in place at your washing machine installation venue; most washing machines require 15 amps of electrical input current for their functions. Ensure this electrical outlet is properly grounded to safeguard against electrical hazards.
Fully automatic washing machines do not allow laundry overloads but please be mindful of semi-automatics. Avoid using another major current-withdrawing-equipment such as a water heater or heavy-watt mixer grinder simultaneously when using washing machines. Such situations may put extra load on the electrical circuits of your house, leading to fuse failure or another possible electrical hazard.
Let’s move to learning the step-by-step procedure for washing machine installation.
Installing Your Washing Machine
Post the pre-installation considerations, we need some tools to ensure things go calculated during the washing machine installation process. Let’s look at them.
Tools and Materials for washing machine installation
Tools
- Measuring tape (Good to have, may not be required)
- Small-size adjustable wrench ( to tighten the adaptor and possibly the hose)
- Spirit Level (to check the vertical and horizontal levels)
- A screwdriver ( in most cases would work)
- Electricity Tester (For tightening the screws in adaptor and other related uses)
Materials
- Inlet Water Pipe
- Drain hose
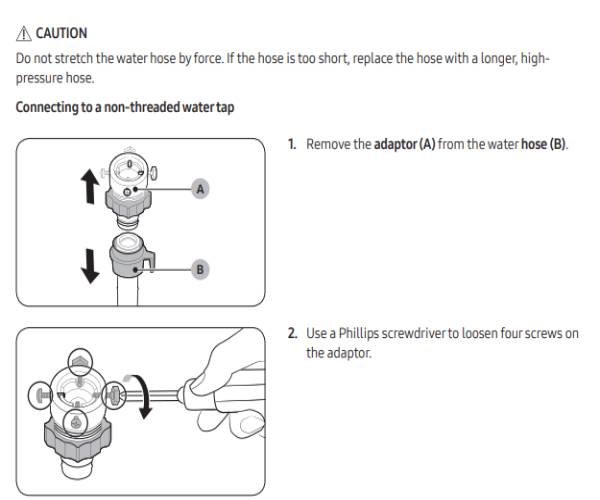
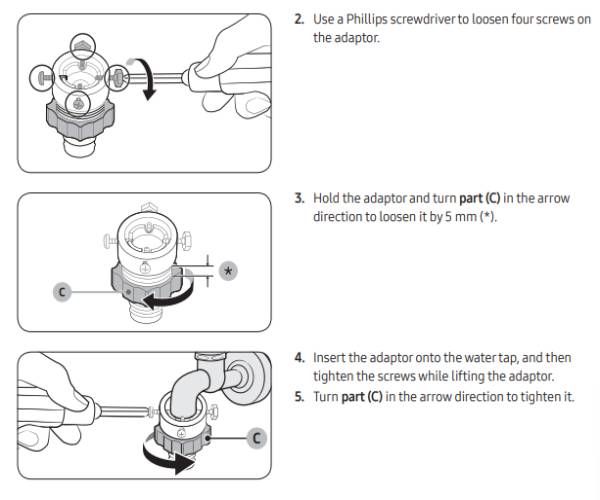
- Adapter for Inlet water pipe
- Clamps (2 Nos)
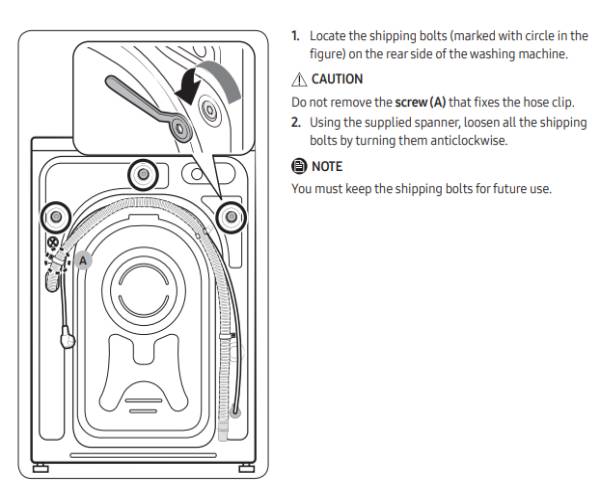
Remove the Transportation Nuts
Start with removing the transportation nuts. These nuts have no use in the washing process and should be removed to ensure proper installation.
Connect the drain hose and Water inlet pipe with the Washing Machine
- Use clamps to connect the drain hose to the washing machine( depending upon models, clamps may not be required)
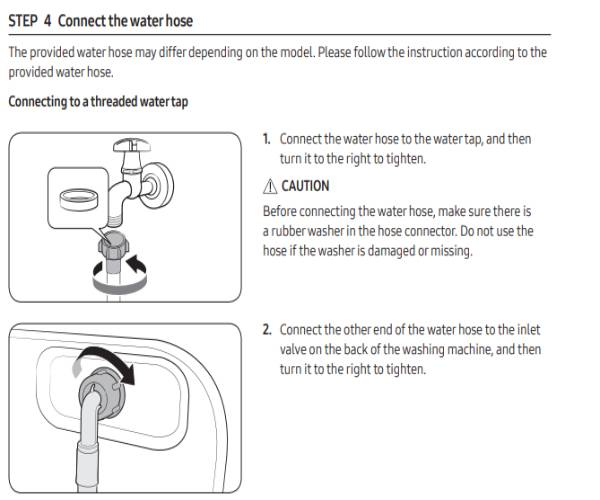
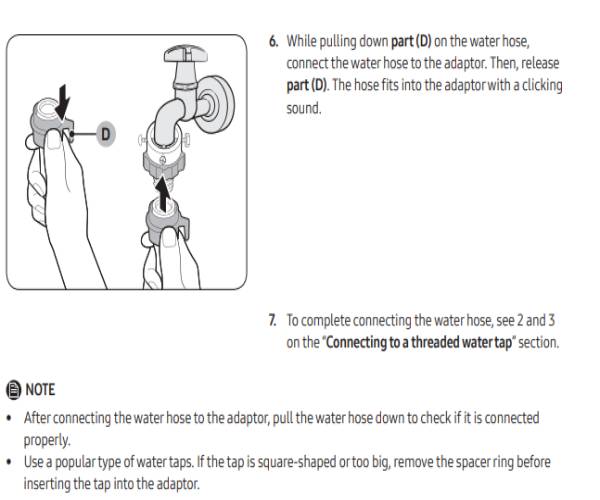
- Connect the water inlet hose with an adapter and integrate it with your washing machine.
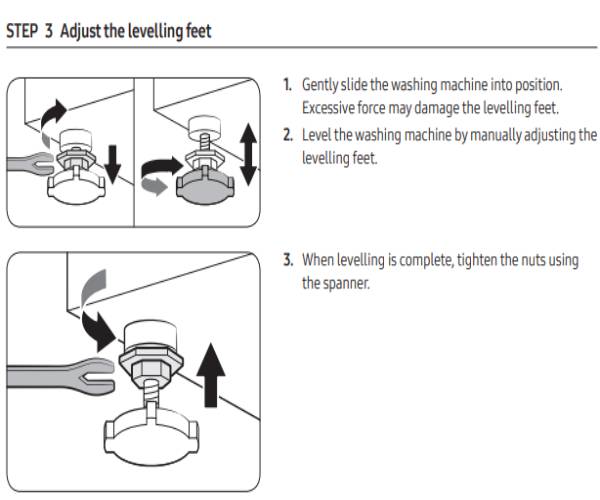
Level Your Washing Machine
Place the washing machine on a uniform floor. The area surrounding the washing machine should have enough space to allow operating and handling of the washing machine conveniently. Now use the level tool on the top of the washer to measure the machine’s stability on the floor. If needed, adjust the legs until the bubble in the spirit level is centrally aligned. Use washing machine stands if your floor is uneven. Similarly, check the vertical alignment by placing the Spirit Level on the side panels of the washing machines. Tighten the lock nuts on the legs after leveling, and your washing machine is good to go for a trial run.
Please note that washing machine stability is crucial to ensure non-vibration or excessive noise during the machine operations.
Securing Hoses and Connections
Connect the water supply hose to the water supply point and if required (if the water inlet hose is long and heavy) secure them with clamps. Keeping long and heavy water inlet hose may create stress at the endpoints, weakening the attachments in the long run.
It’s recommended to replace the rubber washers inside the hose fittings every few years to prevent water leaks.
Ensuring Proper Ventilation
Washing laundries involves fighting soil specks using hot or cold water and detergent solutions. This process sometimes creates excessive moisture around the machine parts. Removing the moisture is essential to protect the machine against mold, mildew growth, and scale formation. As such, proper ventilation becomes essential. Maintaining good airflow prevents excess moisture formation.
Scales developed inside the machine can be removed with cleaning agents. The external body should be cleaned with a specialised solution to protect the washing machine’s aesthetics in the long run.
Safety and Maintenance
Ensuring the Safety of the washing machine is vital to protect this value investment against damages. Here’s a checklist to ensure safe washing machine installation and operation.
Essential Safety Precautions
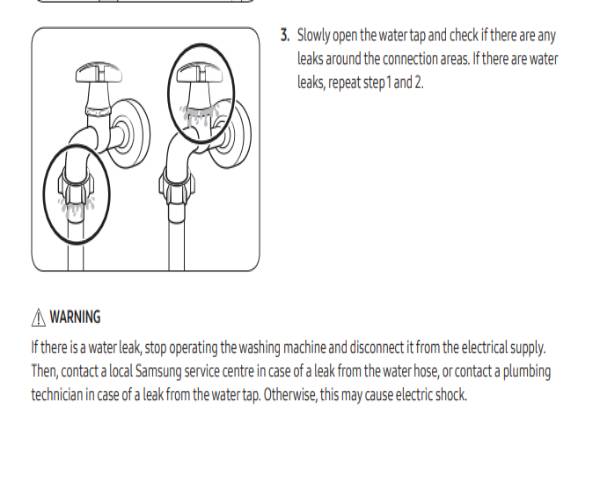
- Ensure all connections are tight to avoid leaks.
- Keep the area around the washing machine clean and dry to prevent slips and falls.
- Regularly check the hoses and fittings for wear and replace them if needed.
- Ensure the electrical connections are not loose as this may lead to sparks in the socket.
- Test all machine indicators are working. For example, water supply indicators can be checked by turning off the tap, Restore functions can be checked by switching off and on the power supply, water level indicators can be checked with a trial run, etc.
- Test the child lock for proper functioning.
In case of some issues, please follow the recommended process for reaching out the customer support and registering a complaint with them.
Long-term Maintenance Tips
Long-term maintenance tips may include:
- Cleaning the wash tub once a month and descaling once every three to six months.
- Use a good descaling agent, one that does not use chemicals.
- Clean the water inlet pipe to ensure adequate water flow speed.
When to Hire a Professional
While the first-time installations and commissioning are mostly covered by the machine brands, there can be instances when you need to Do It Yourself. Ensure you understand the installation process or we recommend hiring experienced professionals to install the washing machines.
Hiring professionals can guarantee all connections are secure and can benefit the users with their advice on optimal performance, placement, and maintenance. Experts can notice unusual sounds for a possible defect and can suggest you lodge complaints with the seller/ manufacturer as per the washing machine warranty programs.
Washing machine installation service
Washing machine servicing can be done in two ways:
- Contact the brand support: Choose this option if your washing machine is under warranty and enquire if the servicing can be done for free.
- Contact a local washing machine technician: Ensure that the technician has ample experience with the washing machine type you own. Enquire his service charges before booking a service date.
Washing machine installation Charges
Washing machine installation charges may vary across the Indian cities but the visit charge usually starts at Rs 500. This charge would involve thorough inspection and rectification of the issues. Parts replacement, if needed, would cost additionally depending on the buying cost of the damaged part.
Washing machine installation near me
Look for a local directory to find a local expert for your washing machine installation, or visit the washing machine brand’s website to find the contact details of their service centers in your area.
Washing machine installation diagram
The images below show washing machine installation diagrams that a user can refer when installing a washing machine. Please note that some steps defer slightly for the washing machine model. Please read the diagrams to get an overview to installing the washing machine.
Step 1: Decide the Installation Location
Step 2: Remove the shipping nuts

Step 3: Adjust the levelling feet
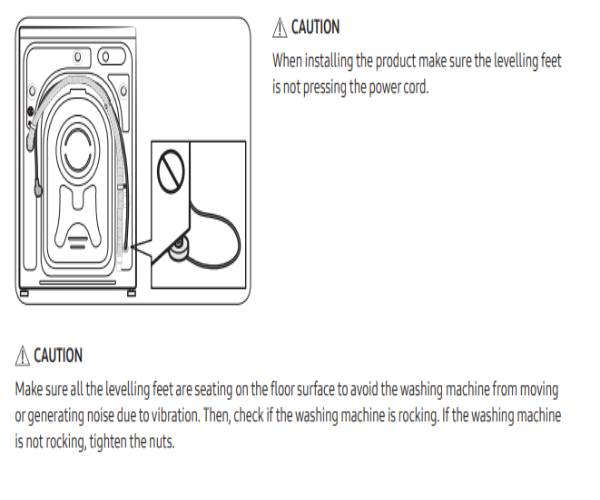
Step 4: Connect the water Hose
Step 5: Position the drain hose
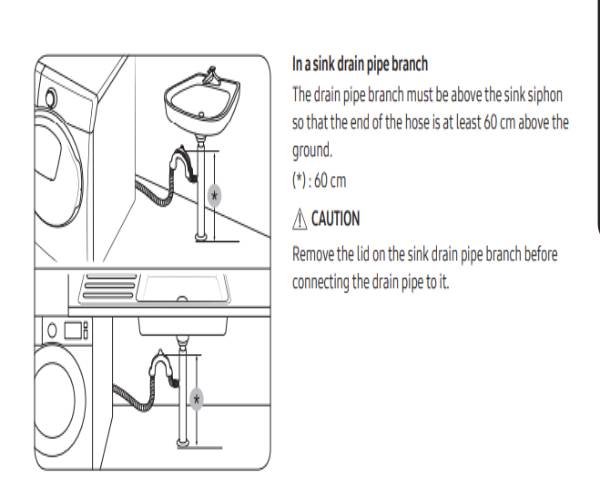
Step 6: Power On
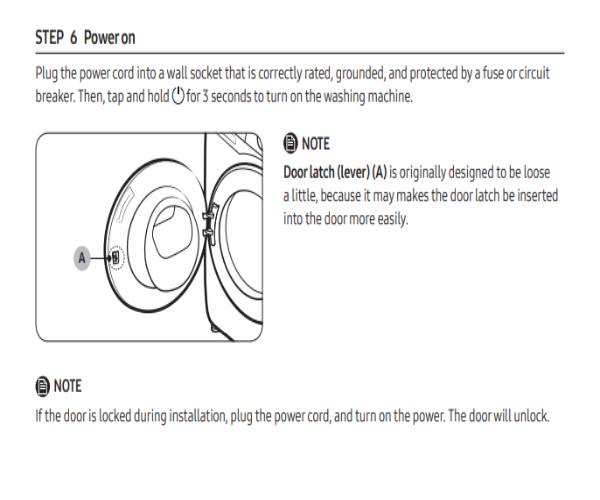
Wrapping Up
Washing Machine installation may look like a simple job but it needs careful analysis of the steps to complete installation.
Proper installation of your washing machine is key to ensuring efficient operation and preventing issues down the line. Follow the given guidelines carefully, and don’t hesitate to call a professional if you’re unsure about any steps.
If you have any questions about installing your washing machine or if you need professional assistance, feel free to leave a comment below or contact a local expert. Hope this guide was helpful, and that you loved it. If so, please share it with your friends.
Thank You.
